
Project Overview:
This beginner-friendly project demonstrates how to control a servo motor with an Arduino. The servo motor will oscillate back and forth between 1 and 179 degrees, creating a sweeping motion. This setup is ideal for learning basic servo control and PWM (Pulse Width Modulation).
How It Works:
A servo motor is controlled by sending a PWM signal from the Arduino. By varying the signal’s width, you can position the servo at different angles. In this project, the servo motor sweeps from 1 degree to 179 degrees and then returns, continuously repeating the motion.
Components List:
- Arduino Board (e.g., Uno, Nano, etc.)
- Servo Motor
- Jumper Wires
- Breadboard (optional)
- Power Supply (for Arduino)
Software List:
Arduino IDE (Integrated Development Environment)Circuit Diagram and Connection:
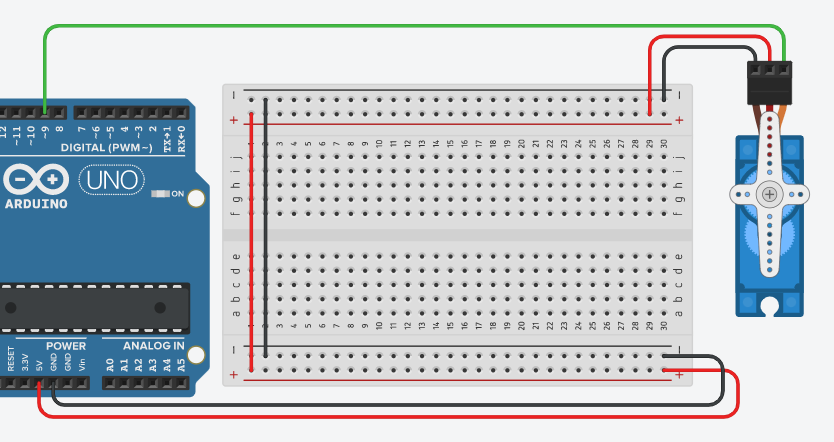
Connect the signal pin of the servo motor to Digital Pin 9 on the Arduino.
Connect the power pin of the servo motor to the 5V pin on the Arduino.
Connect the ground pin of the servo motor to the GND pin on the Arduino.
Project Code:
#include <Servo.h>
int position = 0; // Variable to store the servo position
Servo servo_9; // Create a Servo object
void setup() {
servo_9.attach(9, 500, 2500); // Attach the servo to pin 9 with specified pulse width range
}
void loop() {
// Sweep from 1 to 179 degrees
for (position = 1; position <= 179; position += 1) {
servo_9.write(position); // Set the servo position
delay(20); // Wait for 20 milliseconds for the servo to reach the position
}
// Sweep from 179 to 1 degrees
for (position = 179; position >= 1; position -= 1) {
servo_9.write(position); // Set the servo position
delay(20); // Wait for 20 milliseconds for the servo to reach the position
}
}
Explanation of the Code:
Library Include: #include <Servo.h> includes the Servo library for controlling servo motors.
Variable Declaration: int position = 0; initializes a variable to store the current position of the servo.
Setup Function:
servo_9.attach(9, 500, 2500); attaches the servo to pin 9 with a pulse width range of 500 to 2500 microseconds.
Loop Function:
Sweeping Forward: The for loop increments the position from 1 to 179 degrees, setting the servo position and waiting for 20 milliseconds.
Sweeping Backward: The second for loop decrements the position from 179 to 1 degrees, again setting the servo position and waiting for 20 milliseconds.
Test and Troubleshooting:
Testing: Upload the code to your Arduino. The servo motor should sweep back and forth between 1 and 179 degrees.
Troubleshooting:
Ensure the servo motor is connected properly to the correct pins.
Verify that the power supply is sufficient for the servo motor.
Check that the servo motor can handle the specified pulse width range.
Summary:
In this project, you learned how to control a servo motor using Arduino, creating a sweeping motion. This basic setup introduces you to servo control and PWM, which can be applied to more complex robotics and automation projects.


No comments