
Project Overview:
This project creates a reaction-based game using an Arduino. The game randomly selects one of five LEDs and waits for the player to press the corresponding button. If the correct button is pressed, all LEDs light up and the buzzer sounds as a reward. If the wrong button is pressed, only the corresponding LED lights up, and the player can try again.
Components List:
- Arduino Uno (or compatible)
- 5 x LEDs
- 5 x Push Buttons
- 1 x Buzzer
- 10 x 220Ω Resistors (for LEDs and buttons)
- Breadboard and Jumper Wires
Circuit Connection:
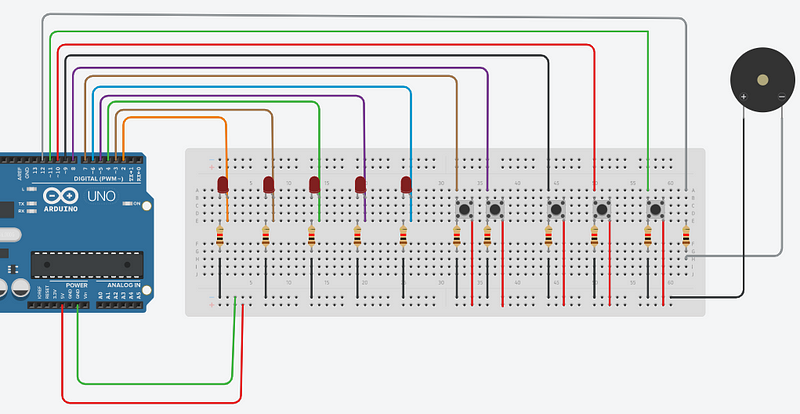
- LED Setup:
- Connect each LED’s positive leg to digital pins 2 through 6.
- Connect each LED’s negative leg to GND through a 220Ω resistor.
- Button Setup:
- Connect one side of each button to digital pins 7 through 11.
- Connect the other side to GND.
- Pull up each button’s pin internally using the
INPUTmode (no need for external pull-up resistors).
- Buzzer Setup:
- Connect the buzzer’s positive leg to digital pin 12.
- Connect the buzzer’s negative leg to GND.
Project Code:
int led[5] = {2, 3, 4, 5, 6};       // LED pins
int button[5] = {7, 8, 9, 10, 11};  // Button pins
int buzzer = 12;                    // Buzzer pin
int randomled;
int switch_val = -1;
bool stop = true;

void setup() {
  Serial.begin(9600);
  for(int i = 0; i < 5; i++) {
    pinMode(led[i], OUTPUT);
    pinMode(button[i], INPUT_PULLUP);
  }
  pinMode(buzzer, OUTPUT);

  randomSeed(analogRead(0));  // Seed the random function using analog noise
  reset();  // Select the first random LED
}

int reset() {
  randomled = random(5);  // Get a random index for LED (0-4)
  Serial.println(randomled + 1);  // Print the selected LED number (1-5)
  noTone(buzzer);  // Stop any sound from the buzzer
  return randomled;
}

void loop() {
  if(stop) {
    for(int i = 0; i < 5; i++) {
      int x = digitalRead(button[i]);
      if(x == LOW) {  // Button pressed (LOW due to pull-up)
        switch_val = i;
        break;
      }
    }
  }

  if(switch_val != -1 && stop) {
    if(button[switch_val] == button[randomled]) {
      // Correct button pressed
      digitalWrite(led[switch_val], HIGH);
      tone(buzzer, 1000);  // Play buzzer sound
      delay(2000);
      noTone(buzzer);  // Stop buzzer sound

      for(int i = 0; i < 5; i++) {
        digitalWrite(led[i], HIGH);  // Turn all LEDs on
      }

      delay(2000);  // Keep LEDs on for 2 seconds
      for(int i = 0; i < 5; i++) {
        digitalWrite(led[i], LOW);  // Turn all LEDs off
      }

      reset();  // Select a new random LED
      switch_val = -1;
      stop = true;

    } else {
      // Incorrect button pressed
      digitalWrite(led[switch_val], HIGH);
      delay(500);
      digitalWrite(led[switch_val], LOW);  // Turn off the wrong LED
      switch_val = -1;
    }
  }
}
Explanation of the Code:
- Setup Function:
- Configures the LED pins as outputs and button pins as inputs with internal pull-up resistors.
- Seeds the random number generator using
randomSeed(analogRead(0))to ensure different LED patterns each time the game starts. - Calls the
reset()function to choose the first random LED.
- Reset Function:
- Chooses a random LED to be the target.
- Stops any buzzer sound that may have been playing.
- Loop Function:
- Button Check: Constantly checks if any button has been pressed.
- Correct Button Press: If the correct button is pressed, the corresponding LED lights up, the buzzer sounds, and then all LEDs light up as a reward.
- Incorrect Button Press: If the wrong button is pressed, the corresponding LED briefly lights up, and the player can try again.
Summary:
This project is a simple yet effective game that tests reaction time and accuracy. It is a great way to practice handling digital inputs and outputs with Arduino. The buzzer provides audio feedback, making the game more engaging and fun.


No comments