
Setting Up NodeMCU ESP8266 Wi-Fi Module
Setting up NodeMCU is very easy and it won’t take much time. This can be done in few simple components and simple steps.
Components required
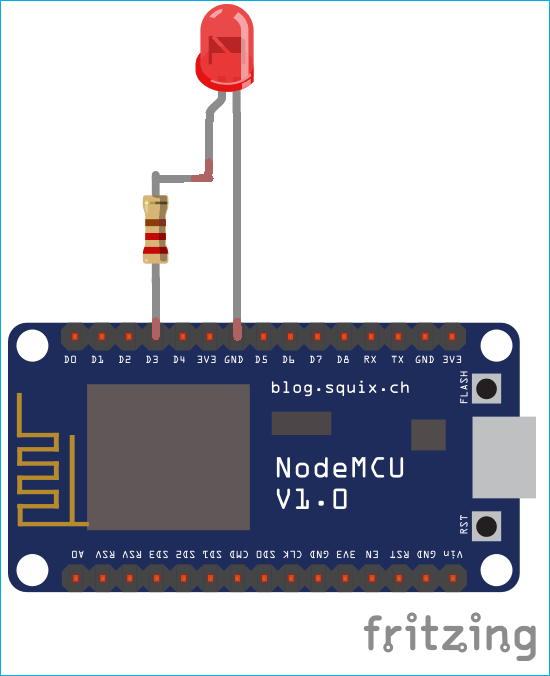
NodeMCU ESP8266(12E)
Led
Circuit Diagram
Once you are all set with components please follow simple steps mentioned below:
Connect NodeMCU with Computer.
Open Arduino IDE.
Goto ‘Tools’ and Select ‘Boards’.
In board’s section, select ‘NodeMCU V1.0 (ESP-12E Module)’.
Also select appropriate COM Port.
After finding the “FIREBASE_HOST” and “FIREBASE_AUTH” following the steps mentioned below, edit this in sketch given below and upload.
Programming NodeMCU ESP8266 for using Google Firebase
Complete program with working Video is given at the end. Here we are explaining few important parts of the code.
Firstly include the libraries for using ESP8266 and firebase
.#include <ESP8266WiFi.h
#include <FirebaseArduino.h
Download and install the libraries by following the below links:
https://github.com/FirebaseExtended/firebase-arduino/blob/master/src/Firebase.h
https://github.com/bblanchon/ArduinoJson
While compiling, if you get error that ArduinoJson.h library is not installed then please install it using link given above.
These two parameters are very important to communicate with firebase. Setting these parameters will enable the data exchange between and ESP8266 and firebase. To find these parameters for your project, follow the steps given in later section (Setting Up Firebase) below
.#define FIREBASE_HOST "your-project.firebaseio.com" // the project name address from firebase id
#define FIREBASE_AUTH "06dEpqanFg***************qAwnQLwLI" // the secret key generated
from firebase
from firebase
After successfully finding the credentials, just replace in the above code.
Below parameters are used to connect to your home Wi-Fi network or the network that you setup. Replace SSID and password with your network SSID and password. Also internet is required in order to communicate with firebase.
#define WIFI_SSID "xxxxxxxxxxxxx" // input your home or public wifi name
#define WIFI_PASSWORD "xxxxxxxxxxxxxx" //password of wifi ssid
This statement tries to connect with your entered Wi-Fi network.
This statement tries to connect with your entered Wi-Fi network.
WiFi.begin(WIFI_SSID, WIFI_PASSWORD); //try to connect with wifi
When connecting to Wi-Fi, if it doesn’t connect to network then just print(.) until it is not successfully connected.
When connecting to Wi-Fi, if it doesn’t connect to network then just print(.) until it is not successfully connected.
while (WiFi.status() != WL_CONNECTED) {
Serial.print(".");
delay(500);
}
This statement tries to connect with firebase server. If the host address and authorization key are correct then it will connect successfully
Firebase.begin(FIREBASE_HOST, FIREBASE_AUTH); // connect to firebase
This is the class provided by firebase library to send string to firebase server. To use more classes go to this link. Initially send one string to the home path. With the help of this we can change the status of LED.
This is the class provided by firebase library to send string to firebase server. To use more classes go to this link. Initially send one string to the home path. With the help of this we can change the status of LED.
Firebase.setString("LED_STATUS", "OFF"); //send initial string of led status
After sending one status string to firebase path, write this statement to get the status of LED from same path and save it to variable.
After sending one status string to firebase path, write this statement to get the status of LED from same path and save it to variable.
fireStatus = Firebase.getString("LED_STATUS"); // get ld status input from firebase
If received string is “ON” or “on” then just turn on built-in LED and externally connected LED.
If received string is “ON” or “on” then just turn on built-in LED and externally connected LED.
if (fireStatus == "ON" || fireStatus == "on")
{ // compare the input of led status received from firebase
Serial.println
("Led Turned ON");
digitalWrite(LED_BUILTIN, HIGH); // make bultin led ON
digitalWrite(led, HIGH); // make external led ON
}
If received string is “OFF” or “off” then just turn off built-in LED and externally connected led.
If received string is “OFF” or “off” then just turn off built-in LED and externally connected led.
else if (fireStatus == "OFF" || fireStatus == "off")
{ // compare the input of led status received from firebase
Serial.println("Led Turned OFF");
digitalWrite(LED_BUILTIN, LOW); // make bultin led OFF
digitalWrite(led, LOW); // make external led OFF
}
If received string is not any of these then just ignore and print some error meesage
If received string is not any of these then just ignore and print some error meesage
else {
Serial.println("Wrong Credential! Please send ON/OFF");
}
Setting Up Firebase Console
If you are using Firebase first time then you may take some time to setting it up. Have patience and follow these steps.
1. If you have Gmail id then you don’t need to Sign Up for firebase, if you don’t have Gmail id then Sign Up for one and then you can go to next step.
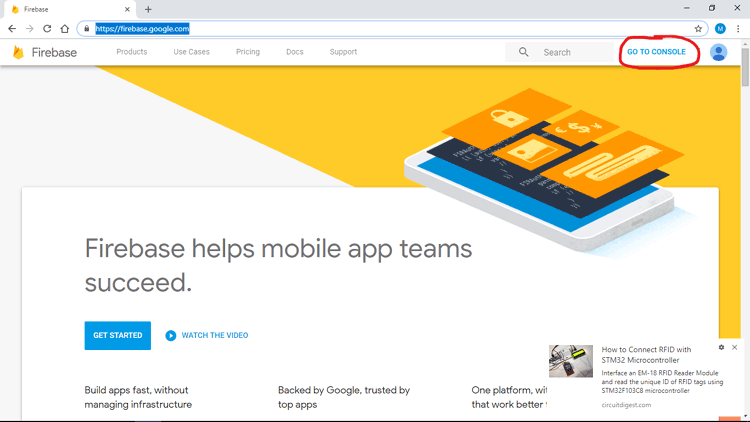
2. Open your browser and go to “firebase.google.com”
3. At the right top corner go to “Go to Console”
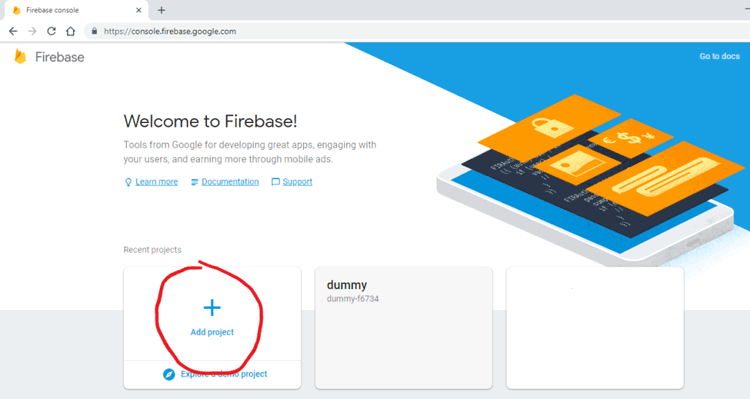
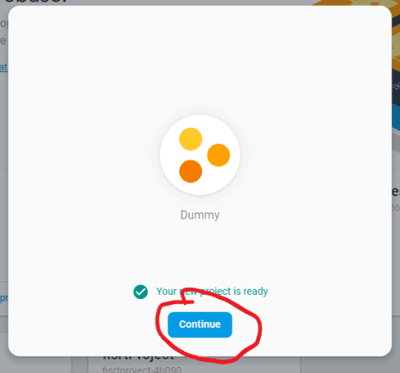
4. Click on “Add project”
5. Input your Project Name.
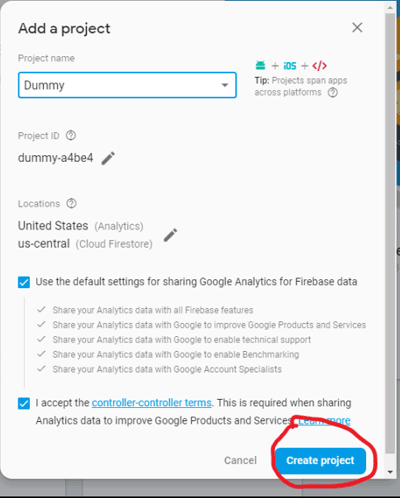
6. Accept the terms and condition, Create project and click on “Continue”
You have successfully created your project. Look for the Host Name and Authorization Key also known as Secret Key. For this, follow steps given below:
7. Go to Settings Icon(Gear Icon) and click on “Project Settings”
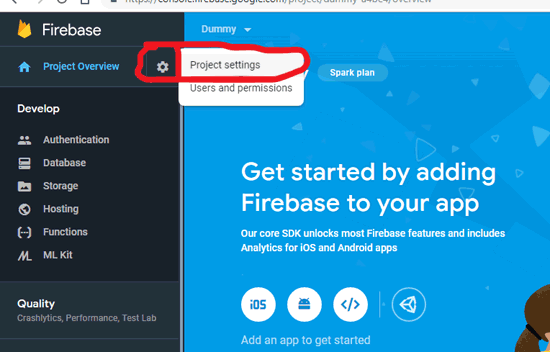
8. Now click on “Service Accounts”

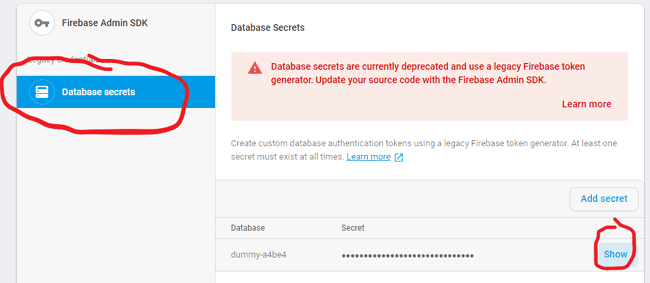
9. You can see two options “Firebase admin SDK” and “Database Secrets”
10. Click on “Database Secrets”
11. Scroll on your project name and ”Show” option appears at right side of your project
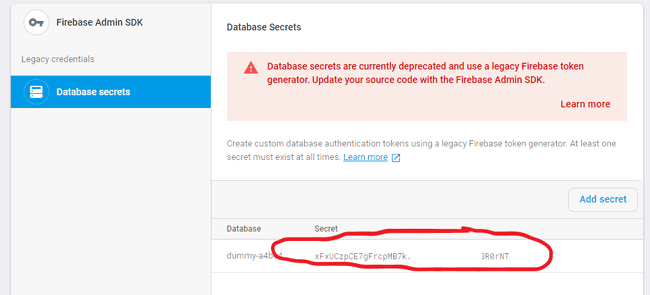
12. Click on “Show” and now you can see secret key created for your project
13. Copy the secret key and save it to notepad. This is your “FIREBASE_AUTH” string which we have written in Arduino program above.
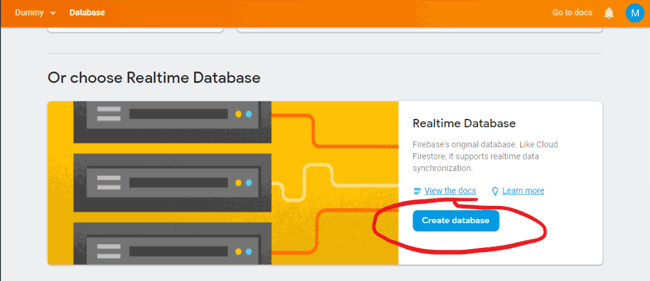
14. Now go to “Database” on left control bar and click on it
15. Scroll down and click on “Create Database”
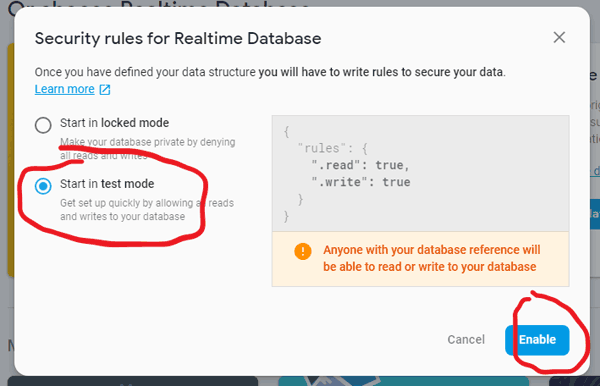
16. Choose “Start in test mode” and click on “Enable”
17. Now your database is created and you will have to come to this section again to control LED
18. Now just above the database you can see
“https://your_project_name.firebaseio.com/”
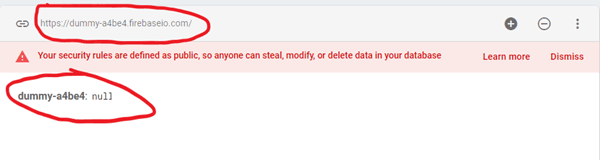
19. Just copy “your_project_name.firebaseio.com” without any slash and https and save it again to notepad just you had saved for secret key
20. This is your “FIREBASE_HOST” string which we have written in Arduino program above
21. You can explore the firebase but let’s finish the tutorial first.
Now put “FIREBASE_HOST” and “FIREBASE_AUTH” in Arduino program and upload the sketch. And we are done with setting up both sections. Complete Arduino Program is given at the end.
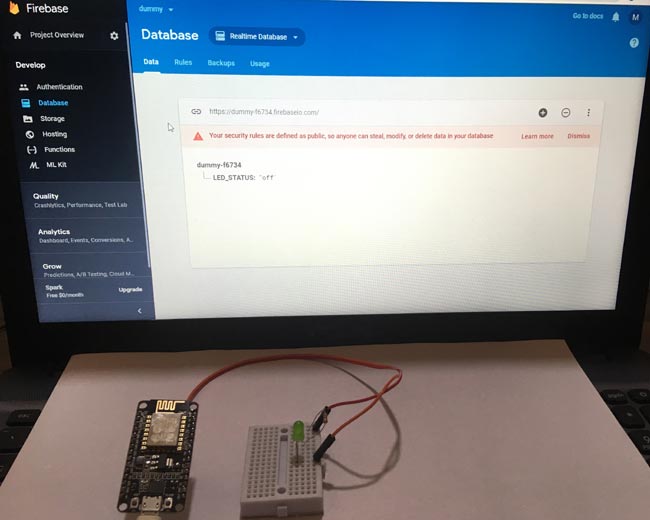
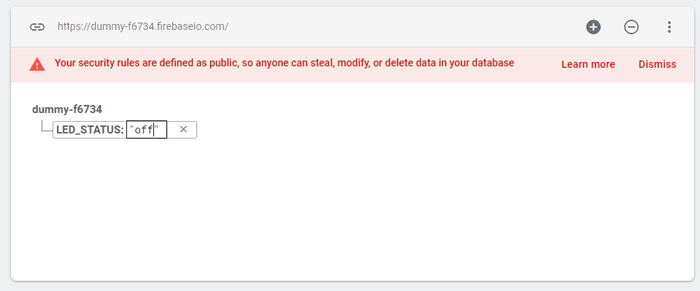
Open the firebase database and write “ON” or “OFF” or “on” or “off” in “LED_STATUS” section to control LED from Google Firebase console.
Watch the Video below to understand the working of the project. We will send temperature and humidity data to firebase cloud in our next project.
Setting Up Firebase Console
If you are using Firebase first time then you may take some time to setting it up. Have patience and follow these steps.
1. If you have Gmail id then you don’t need to Sign Up for firebase, if you don’t have Gmail id then Sign Up for one and then you can go to next step.
2. Open your browser and go to “firebase.google.com”
3. At the right top corner go to “Go to Console”

4. Click on “Add project”
5. Input your Project Name.
6. Accept the terms and condition, Create project and click on “Continue”
You have successfully created your project. Look for the Host Name and Authorization Key also known as Secret Key. For this, follow steps given below:
7. Go to Settings Icon(Gear Icon) and click on “Project Settings”
8. Now click on “Service Accounts”
9. You can see two options “Firebase admin SDK” and “Database Secrets”
10. Click on “Database Secrets”
11. Scroll on your project name and ”Show” option appears at right side of your project
12. Click on “Show” and now you can see secret key created for your project
13. Copy the secret key and save it to notepad. This is your “FIREBASE_AUTH” string which we have written in Arduino program above.
14. Now go to “Database” on left control bar and click on it
15. Scroll down and click on “Create Database”
16. Choose “Start in test mode” and click on “Enable”
17. Now your database is created and you will have to come to this section again to control LED
18. Now just above the database you can see
“https://your_project_name.firebaseio.com/”
19. Just copy “your_project_name.firebaseio.com” without any slash and https and save it again to notepad just you had saved for secret key
20. This is your “FIREBASE_HOST” string which we have written in Arduino program above
21. You can explore the firebase but let’s finish the tutorial first.
Now put “FIREBASE_HOST” and “FIREBASE_AUTH” in Arduino program and upload the sketch. And we are done with setting up both sections. Complete Arduino Program is given at the end.
Open the firebase database and write “ON” or “OFF” or “on” or “off” in “LED_STATUS” section to control LED from Google Firebase console.
Watch the Video below to understand the working of the project. We will send temperature and humidity data to firebase cloud in our next project.
Code
#include <ESP8266WiFi.h> // esp8266 library
#include <FirebaseArduino.h> // firebase library
#define FIREBASE_HOST "your -project.firebaseio.com" // the project name address from firebase id
#define FIREBASE_AUTH "06dEpqanFg *********** qAwnQLwLI" // the secret key generated from firebase
#defineWIFI_SSID "xxxxxxxxxxxxx" // input your home or public wifi name
#define WIFI_PASSWORD "xxxxxxxxxxxxxx" // password of wifi ssid
String fireStatus = ""; // led status received from firebase
int lead = D3; // for external led
void setup () {
Serial.begin (9600);
delay (1000);
pinMode (LED_BUILTIN, OUTPUT);
pinMode (led, OUTPUT);
WiFi.begin (WIFI_SSID, WIFI_PASSWORD); // try to connect with wifi
Serial.print ("Connecting to");
Serial.print (WIFI_SSID);
while (WiFi.status ()! = WL_CONNECTED) {
Serial.print (".");
delay (500);
}
Serial.println ();
Serial.print ("Connected to");
Serial.println (WIFI_SSID);
Serial.print ("IP Address is:");
Serial.println (WiFi.localIP ()); // print local IP address
Firebase.begin (FIREBASE_HOST, FIREBASE_AUTH); // connect to firebase
Firebase.setString ("LED_STATUS", "OFF"); // send initial string of led status
}
void loop () {
fireStatus = Firebase.getString ("LED_STATUS"); // get ld status input from firebase
if (firestatus == "ON") {// compare the input of led status received from firebase
Serial.println ("Led Turned ON");
digitalWrite (LED_BUILTIN, LOW); // make bultin led ON
digitalWrite (led, HIGH); // make external led ON
}
else if (firestatus == "OFF") {// Compare the input of led status received from firebase
Serial.println ("LED Turned OFF");
digitalWrite (LED_BUILTIN, HIGH); // make bultin led OFF
digitalWrite (led, LOW); // make external led OFF
}
else {
Serial.println ("Wrong Credential! Please send ON / OFF");
}
}


No comments