
What is The Object of this Project....
Today i show you how to interface DHT sensor Value in Blynk Apps use NodeMcu8266 .
At the End of this tutorial You know about........
## You can interface DHT sensor to NodeMcu
## you know how to add DHT library on ardunio board
## You can create a Project use Blynk apps
## you can Uplod program and run
Ok Lest Go.................
Step 1!
Interface DHT to NodeMcu following Connection
 |
| DHT Sensor -Mechatronicslabrpi |
 |
| DHT to NodeMcu Connection-Mechatronicslabrpi |
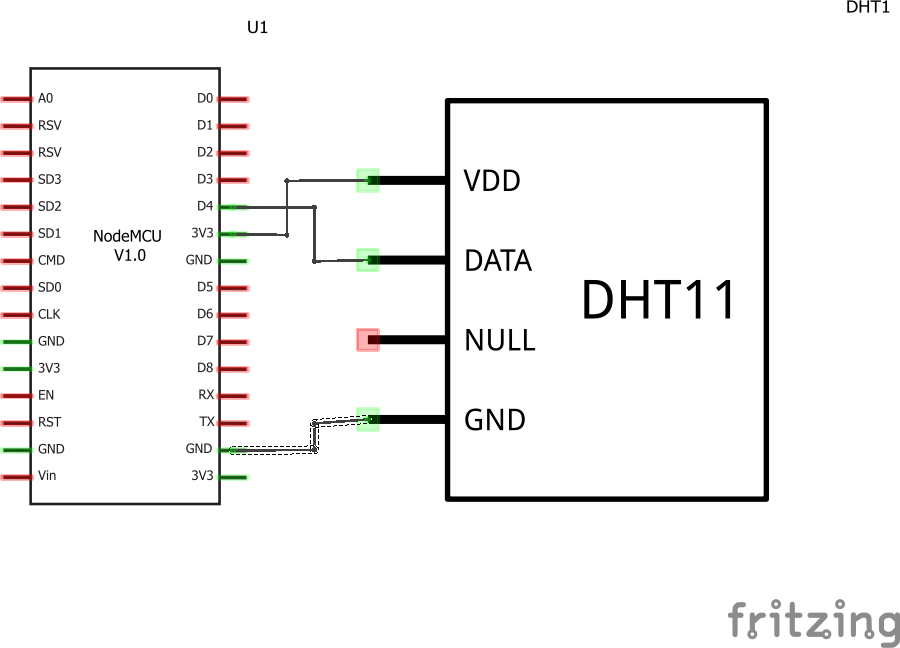 |
| NodeMcu to Dht Interface-Mechatronicslabrpi |
DHT11 sensor measures and provides humidity and temperature values serially over a single wire.
It can measure relative humidity in percentage (20 to 90% RH) and temperature in degree Celsius in the range of 0 to 50°C.
It has 4 pins; one of which is used for data communication in serial form.
Pulses of different TON and TOFF are decoded as logic 1 or logic 0 or start pulse or end of frame.
More Information on This DataSheet Click Here Or Click Here
Step-2!Now You Have to need Download DHT library and Include Ardunio Board Following Instruction
 |
| Dht Library add-Mechatronicslabrpi |

Step-3!
create a Project use Blynk apps Following Instruction
First LogIn your Blynk App Then Flow the Step By Step
Step1 -Create A New Project
 |
| Blink NewProject-Mechatronicslabrpi |
Step2- Select Your project name and Board(I Select Name DHT Monitoring System and Bord NodeMcu) then Press Create
 |
| Blynk give Name-Mechatronicslabrpi |
Step3 -This is vary important Step Hear you got your AUTH TOKEN it send to your email address. Press OK
 |
| Blink Auth Token-Mechatronicslabrpi |
Step4- Now you can see your Interface like this
 |
| Blynk interface -Mechatronicslabrpi |
Step5-Now go to Widget Box And select Gauge
 |
| Blynk Waidget Box-Mechatronicslabrpi |
Step6- After Two Gauge select See like this interface
 |
| Blynk Set Gase-Mechatronicslabrpi |
Step7- Now Go to Gauge settion and Select the neme, Input, Reading (Hear i select Name Temperature, Humanity Input= V0,V1 and Reading Rate 1 Sec )
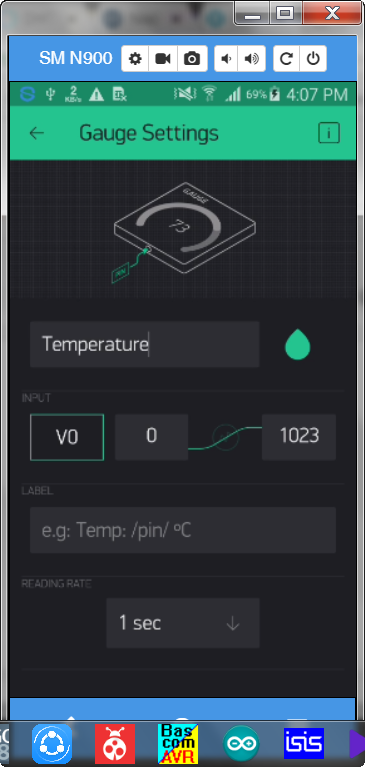
Step8- After Given Information show like this

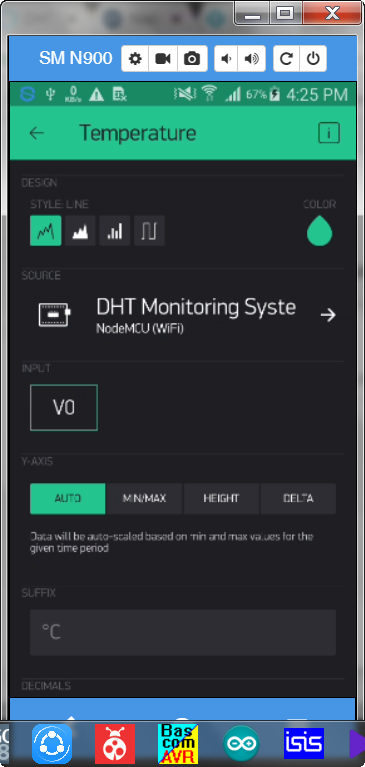
Step9-Now Again go to Widget Box and select SuperChart

Step10- Now go to SuperChat Setting set Name, DataStrme (I Select Name=Temperature & Humanity DataStrm =Temperature , Humanity )go to dataserm setting set input V0 for Temperature V1 for Humanity


App setting Completed
About More information in ardunio board Intoduction to nodemcu8266 & Steps to Import ESP Board Libraries
Now The step of Ardunio IDA Programming Upload Click Here for download Program
 |
| NodeMcu ardunio -Mechatronicslabrpi |
Final you can see
 |
| Final Interface-Mechatronicslabrpi |
About More Project


very nice post..thanks sir
ReplyDelete