
Project Overview:
In this project, you'll learn how to use an infrared (IR) remote control with an Arduino to receive and decode signals. This is a foundational project that introduces you to working with IR communication, which can be used in various applications like remote-controlled robots, home automation, and more.
How It Works:
The Arduino is connected to an IR receiver module, which captures the signals sent from a standard IR remote control. The signals are decoded and printed to the Serial Monitor, allowing you to see the unique code associated with each button press on the remote.
Components List:
- Arduino Board (e.g., Uno, Nano, etc.)
- IR Receiver Module (e.g., TSOP38238)
- Jumper Wires
- Breadboard (optional)
- IR Remote Control
- USB Cable (for connecting Arduino to the computer)
Software List:
Arduino IDE (Integrated Development Environment)
Circuit Diagram and Connection:
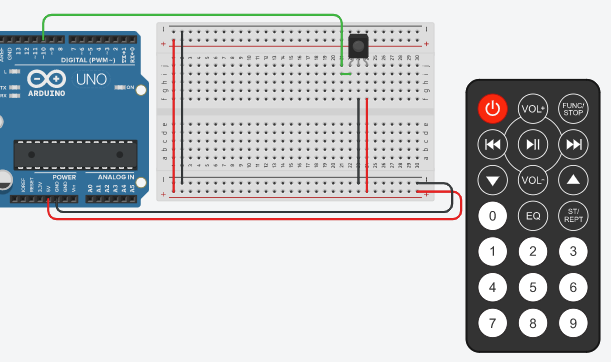
Connect the VCC pin of the IR receiver module to the 5V pin on the Arduino.
Connect the GND pin of the IR receiver to the GND on the Arduino.
Connect the OUT pin of the IR receiver to Digital Pin 10 on the Arduino.
Project Code:
#include <IRremote.h>
int RECV_PIN = 10;
IRrecv irrecv(RECV_PIN);
decode_results results;
void setup() {
Serial.begin(9600);
irrecv.enableIRIn();
Serial.println("IRin Online");
}
void loop() {
if (irrecv.decode(&results)) {
Serial.println(results.value, DEC);
irrecv.resume();
}
delay(100);
}
Explanation of the Code:
Library Inclusion: The IRremote library is included to handle IR communication.
Pin Configuration: The IR receiver is connected to Digital Pin 10 of the Arduino.
Setup Function: The Serial.begin(9600) initializes serial communication for debugging, and irrecv.enableIRIn() starts the IR receiver.
Loop Function: The code checks if the IR receiver has captured a signal. If a signal is received, it decodes the signal and prints the value to the Serial Monitor. The irrecv.resume() function is used to prepare the IR receiver for the next signal.
Test and Troubleshooting:
Testing: Upload the code to your Arduino and open the Serial Monitor. Press buttons on the IR remote and observe the unique codes printed on the Serial Monitor.
Troubleshooting:
If no values are printed, check the wiring of the IR receiver.
Ensure the IR receiver module is properly connected to the correct pins on the Arduino.
Verify that the IRremote library is correctly installed in the Arduino IDE.
Summary:
In this project, you successfully set up an Arduino to receive and decode signals from an IR remote control. This is a great starting point for projects that involve remote-controlled devices or automation systems. By understanding the basics of IR communication, you're well on your way to more advanced Arduino projects.


No comments